Wednesday, September 23, 2009

Binding with biped

Binding the hands of the biped to follow a object.
This trick is maybe limited for its use, like in animations with swords and weapons which are hold with two hands, but it can be used for anything if you are creative.

Select a hand of the biped and go the "motion" tab.


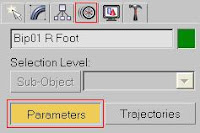
Go to "key info" and extend "IK" from the drop-down menu.

Now you have to set a "planted key" for the selected hand (also highlighted in red in the image below), you will notice that you now can change the pivot point of the hand if you need to.

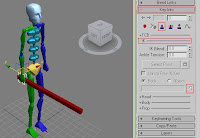
Click on the little white arrow at the end and choose a object what the hand should follow,
in our example it will be a red box which should represent a sword.

A warning will pop up, confirm it with "yes".

You maybe noticed that nothing happened and the hand still doesn't follow the object,
because max uses his standard parameters but we will change that.

You will need to deselect the biped and select the hand again,
above the little white arrow are two options "Body" and "Object".
Change it to "Object" and the hand will follow.

(click on the image to enlarge)


This can be applied to both hands if you use a two handed sword or rifle.
Keep in mind this should make it a lot of easier to animate not just a sword but also the pull of a shot or anything else on what the bipeds movement depends.

Tip:
If you are using a sword and the pivot point is in the middle of the object, you should change it to the position of the hand.
Select the sword and go to "Hierarchy" than choose "select pivot only" and position the pivot.
Click again on "select pivot only" when you are finished.

Saturday, September 19, 2009

INTRO TO ANIMATION

So you decided to take a step further into the realm of 3d.
Animations are not an easy step to take so let's cover
some basics before you begin any animation you would
like to do:

First off you should have a vision how the animation should look like.
Ok ok... I know of course you know what you want to do.
But it is important to know the timing of things that will happen.

Timing is very important, the hardest thing is to sync the camera
with what actually is happening.
In the beginning I always added a camera at the end of an animation,
just to realize that my timing was out of sync.
and I've done too much actions simultaneously, so the eyes can't
catch all the things what are happening on the screen.
Of course there is also timing in a movement but that is not basic stuff.

Second keep it simple... it would be beautiful if all of us had some big server
in our room so max could handle everything we want to do.
But I for an instance use a laptop which is not that strong, and if
I overdo some effects and particles in the early phase of an
animation I end up working with a slideshow.
Just leave most of the effects for the end and use your imagination instead,
but some basic effects are necessary or you will screw up the timing of everything.

Third look at reference, animating a movement is very hard to get right.
At least in the beginning, to learn some basic movements is maybe boring
but it is necessary.
A big help is some reference of course, if you are animating a walk cycle
it would be great if you look at a movie or something just to see how a
real human walks and then try to copy the movement.

Fourth tips and tricks...? Yes you should get a basic knowledge of
everything that max has to offer.
For example learn something about reactor, than learn IK (inverse kinematics),
than learn how to bind objects... and so on.
In an animation a variety of skills is used to make things look great,
for instance using a ragdoll and reactor instead of animating a fall
by hand, it is not just to save time it will also look more realistic.

I think I covered some good points with this,
and as a special i will show you an animation
on which I'm working right now.
I spend almost 16 hours animating for only around 600 frames
(20 seconds) and there is still so much to do and to repair,
the animation isn't that good but I think it will show you how
much time and effort goes into it...

Sometimes all goes well without any problems but sometimes
I mess up and spend a lot of time on repairing...

(it's just a preview ,not rendered)

Monday, May 18, 2009

3d studio max 2010


Autodesk released a new version of its masterpiece 3d studio max.
So we take a step further in cg software and travel to year 2010.

A lot of new features are implemented which will make our daily
encounter with the 3d world much easier.

Rendering time is for a hobby artist like me a nightmare (should have bought
the server instead of the laptop next to it :) ,
so one of the great new features is a realtime viewport display option
which makes the perspective viewport into a preview of the rendered scene
with lights and shadows.
A great way to spot failures in texture or shadows even before the rendering
has began.

The new Graphite modeling tools bring a hole new level to modeling
(the user interface is now user friendly ;) , improved selection tools
allow new ways to increase or decrease polygons without destroying
the structure of the model.

Mental ray options are also extended with better slider controls.

Here is a link for a free download of a 30 day trial:
usa.autodesk.com


Wednesday, April 8, 2009

Simple walk animation (freestyle)


In this tutorial I will show you how to make a biped walk.

1.1 First we need to create a biped , which can be found under the "Create" tab , than go to "Systems" and choose "Biped".

(click on the image to enlarge)
Now simply click and drag in your "Perspective viewport".

1.2 Turn the "auto key button" on,

(click on the image to enlarge)

1.3 To make the biped walk we need to set 4 keyframes of the walk cycle.

Frame: 0

(click on the image to enlarge)
-Select all parts of the biped and right click the keyframe slider.
-A little window will appear just confirm it with "ok".
-With this we will set the first keyframe at frame 0.
-This is just a starting point and not part of the walk cycle.

Frame: 5

(click on the image to enlarge)
-Set the slider to frame 5.
-Try to copy the image above.
-DON'T move the biped backward or forward.
-Just move him up or down so he fits to the ground.

Frame: 10

(click on the image to enlarge)
-Set the slider to frame 10.
-Try to copy the image above.

Frame: 15

(click on the image to enlarge)
-Set the slider to frame 15.
-Try to copy the image above.

Frame: 20

(click on the image to enlarge)
-Set the slider to frame 20.
-Try to copy the image above.

1.4 The basic walk cycle is done so we need to add some secondary motion.

Frame: 5

(click on the image to enlarge)
-Set the slider to frame 5.
-Try to copy the image above.
-Rotate the spine and the arms.

Frame: 15

(click on the image to enlarge)
-Set the slider to frame 15.
-Try to copy the image above.
-Do the same just in the opposite direction.

1.5 So far we made just 20 frames of the animation , now we just copy the frames.


(click on the image to enlarge)
-Select all parts of the biped.
-In the keyframe bar (under the slider) click and drag to select a keyframe.
-Select the keyframes from 5 to 20.


(click on the image to enlarge)
-Hold "shift" on your keyboard.
-You need to click (on a keyframe) and drag the keyframes to frame 25.

Do this until you wish to end your walk.

1.6 The last step is to make the biped walk forward.

-Select the right foot of your biped (green color)

(click on the image to enlarge)
-Under the "Motion" tab go to "Parameters".


(click on the image to enlarge)
-Go to "Key Info"
-We will use the "Set Planted Key" (Number 1) and the "Set Sliding key" (Number 2).
-The third one is "Set Free Key" which is a normal key that we used in the steps above.

-Go to frame 0.
-With the right foot selected (green color) we will set a "Planted Key" (Number 1).
-Go to frame 5 and set another "Planted key" (Number 1).


(click on the image to enlarge)
-You will notice that the foot does not move back or forward anymore.


(click on the image to enlarge)
-Select the pivot of the biped and move him forward to match the previous stance.

-Go back to frame 0.
-Select the left foot (blue color).
-Set a "Sliding Key" (Number 2).
-Go to frame 5 and set another "Sliding Key".
-At frame 10 set a "Planted Key" (Number 1)


(click on the image to enlarge)
-The red dot is the place where the foot will land.


(click on the image to enlarge)
-Select the pivot of the biped (Bip01) and move him forward.
-Remember we set the vertical movement of the biped (up or down) at step 1.3 .
-The biped keeps going back because of the keys set at step 1.3 .
-Select all the keys (just like in 1.5) beside the keys set so far and delete them.
-Now the biped won't go back anymore, but we have to set the vertical movement again.

-At frame 10 select the right foot and set a "Sliding Key".
-Go to frame 15.
-Select the left foot and set a "Planted key".
-Select the pivot of the biped (Bip01) and move him forward.
-Don't forget to set the vertical movement as well.
-Select the right foot and set a "Sliding Key".

-Go to frame 20.
-With the right foot still selected set a "Planted Key".
-Select the pivot of the biped (Bip01) and move him forward.
-Don't forget to set the vertical movement as well.
-Select the left foot and set a "Sliding key".

-Go to frame 25.
-Select the right foot and set a "Planted key".
-Select the pivot of the biped (Bip01) and move him forward.
-Don't forget to set the vertical movement as well.
-Select the left foot and set a "Sliding key".

I think you get picture of this , set 2 sliding keys than 2 planted keys.
But the order is important.
First comes the planted key.
Second is the movement of the biped.
Third is the sliding key.
And finished...


Tuesday, March 17, 2009

Rigging with skin

In this tutorial I will show you how to rig a model with a skin modifier.
-Open a file were you have a model with bones.
1.1 Select your model and go to the "modify" tab .

1.2 Click on "Modifier List" (dropdown menu) , scroll to the bottom and choose skin.
Now you have applied a skin modifier to your model.

1.3 In the "Parameters" section you will see "bones" with a "Add" button.
Click on the "Add" button and choose all the bones from the scene that you
wish to add to your model (You won't be able to add bones that are hidden or frozen).

1.4 Click on "Edit Envelopes" which is also in the parameters section.
Now choose which bone you want to edit, in this tutorial i will choose an arm.

You will notice a red colored area on the model.


(click on the image to enlarge)
Tip: turn off the material to see it better.

There are three kind of colors (red,yellow,blue) which show you how strong the model will be forced to follow the bone.
Red=strong
Yellow=medium
Blue=weak

1.5 On the image above you will notice that the model will force a part of the chest to follow the movement of the arm. So we need to exclude the part of the chest.

In the "Parameters" section right under "edit envelopes" are the "Select" options.
Click on "Vertices" so the box is checked.
Now select all the vertices that you want to exclude.


(click on the image to enlarge)

Scroll down to "Weight Properties".


(click on the image to enlarge)

Click on "Bake Selected Verts" (Number 4 in the picture above).
Now click on "Exclude Selected Verts" (Number 1 in the picture above).
And the the last one you click is "Select Excluded Verts" (Number 3 in the picture above).

When you "Paint Weights" you will not be able to paint over the excluded vertices.
So we will include the vertices again.

To select all the excluded verts click on "Select Excluded Verts" (Number 3 in the picture above).
To include all the selected vertices click on "Include Selected Verts" (Number 2 in the picture above).

1.6 Use the "Paint weight" tool to refine the rest of the arm. Maybe you will notice that you can't paint anywhere you want on the model, you can only paint in the red colored area or near it.


When you paint the arm and don't want the shoulder to get painted as well just exclude the verts like in step 1.5.

1.7 Do the same with the rest of the model and make a test animation to see where you need to refine the model.