In this tutorial I will show you how to rig a model with a skin modifier.
-Open a file were you have a model with bones.
1.1 Select your model and go to the "modify" tab .
.
1.2 Click on "Modifier List" (dropdown menu) , scroll to the bottom and choose skin.
Now you have applied a skin modifier to your model.
1.3 In the "Parameters" section you will see "bones" with a "Add" button.
Click on the "Add" button and choose all the bones from the scene that you
wish to add to your model (You won't be able to add bones that are hidden or frozen).
1.4 Click on "Edit Envelopes" which is also in the parameters section.
Now choose which bone you want to edit, in this tutorial i will choose an arm.
You will notice a red colored area on the model.
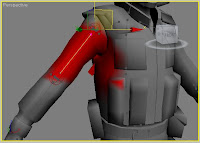
(click on the image to enlarge)
Tip: turn off the material to see it better.
There are three kind of colors (red,yellow,blue) which show you how strong the model will be forced to follow the bone.
Red=strong
Yellow=medium
Blue=weak
1.5 On the image above you will notice that the model will force a part of the chest to follow the movement of the arm. So we need to exclude the part of the chest.
In the "Parameters" section right under "edit envelopes" are the "Select" options.
Click on "Vertices" so the box is checked.
Now select all the vertices that you want to exclude.
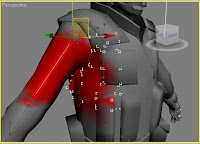
(click on the image to enlarge)
Scroll down to "Weight Properties".
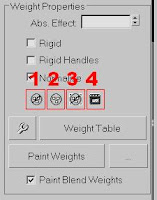
(click on the image to enlarge)
Click on "Bake Selected Verts" (Number 4 in the picture above).
Now click on "Exclude Selected Verts" (Number 1 in the picture above).
And the the last one you click is "Select Excluded Verts" (Number 3 in the picture above).
When you "Paint Weights" you will not be able to paint over the excluded vertices.
So we will include the vertices again.
To select all the excluded verts click on "Select Excluded Verts" (Number 3 in the picture above).
To include all the selected vertices click on "Include Selected Verts" (Number 2 in the picture above).
1.6 Use the "Paint weight" tool to refine the rest of the arm. Maybe you will notice that you can't paint anywhere you want on the model, you can only paint in the red colored area or near it.
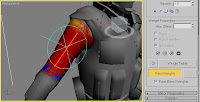
When you paint the arm and don't want the shoulder to get painted as well just exclude the verts like in step 1.5.
1.7 Do the same with the rest of the model and make a test animation to see where you need to refine the model.
-Open a file were you have a model with bones.
1.1 Select your model and go to the "modify" tab
 .
.1.2 Click on "Modifier List" (dropdown menu) , scroll to the bottom and choose skin.
Now you have applied a skin modifier to your model.
1.3 In the "Parameters" section you will see "bones" with a "Add" button.
Click on the "Add" button and choose all the bones from the scene that you
wish to add to your model (You won't be able to add bones that are hidden or frozen).
1.4 Click on "Edit Envelopes" which is also in the parameters section.
Now choose which bone you want to edit, in this tutorial i will choose an arm.
You will notice a red colored area on the model.

(click on the image to enlarge)
Tip: turn off the material to see it better.
There are three kind of colors (red,yellow,blue) which show you how strong the model will be forced to follow the bone.
Red=strong
Yellow=medium
Blue=weak
1.5 On the image above you will notice that the model will force a part of the chest to follow the movement of the arm. So we need to exclude the part of the chest.
In the "Parameters" section right under "edit envelopes" are the "Select" options.
Click on "Vertices" so the box is checked.
Now select all the vertices that you want to exclude.

(click on the image to enlarge)
Scroll down to "Weight Properties".

(click on the image to enlarge)
Click on "Bake Selected Verts" (Number 4 in the picture above).
Now click on "Exclude Selected Verts" (Number 1 in the picture above).
And the the last one you click is "Select Excluded Verts" (Number 3 in the picture above).
When you "Paint Weights" you will not be able to paint over the excluded vertices.
So we will include the vertices again.
To select all the excluded verts click on "Select Excluded Verts" (Number 3 in the picture above).
To include all the selected vertices click on "Include Selected Verts" (Number 2 in the picture above).
1.6 Use the "Paint weight" tool to refine the rest of the arm. Maybe you will notice that you can't paint anywhere you want on the model, you can only paint in the red colored area or near it.

When you paint the arm and don't want the shoulder to get painted as well just exclude the verts like in step 1.5.
1.7 Do the same with the rest of the model and make a test animation to see where you need to refine the model.

Thanks mate, that was really helpful. Hope you're still well into 3D! Cheers from Stu.
ReplyDelete